 TamimahVnc
Which app do I need?
TamimahVnc has a server, which shares a screen, and a viewer, which shows that screen and sends your mouse and keyboard to it.
| You want to… | On the computer being controlled | On the computer you sit at |
|---|---|---|
| Control a Mac from Windows | TamimahVnc for Mac (TamimahVnc-Mac.zip) | TamimahVnc Viewer (TamimahVnc-Viewer-Windows.zip) |
| Control a Windows PC from Windows | TamimahVnc Server (TamimahVnc-Server-Windows.zip) | TamimahVnc Viewer |
| Use another VNC viewer | TamimahVnc for Mac | Any VNC viewer with TLS (VeNCrypt), such as TigerVNC |
All downloads are on the download section of the home page.
Requirements
- Mac: a Mac with Apple silicon (M1 or newer) on a recent version of macOS.
- Windows: Windows 10 or 11, 64-bit. The installers don't need admin rights.
- Network: both computers on the same network, or both on Tailscale. The default port is TCP 5900.
Install on the Mac
- Double-click
TamimahVnc-Mac.zipin Downloads to unzip it, then drag TamimahVnc into Applications. Delete the leftover copy in Downloads so only one TamimahVnc remains. - The app isn't notarized by Apple yet. Open it once from Applications; macOS will block it. Go to System Settings → Privacy & Security, scroll down, click Open Anyway, and confirm. You only do this once.
- The settings window opens. On the General tab, type a password or click Generate. It is saved in your macOS Keychain. If macOS asks whether TamimahVnc may use the Keychain, click Always Allow.
- Allow the two permissions macOS needs (below), then click Start Server.
Allow Screen Recording and Accessibility
If a yellow banner appears at the top of the settings window, click its buttons. Or open System Settings → Privacy & Security and turn on TamimahVnc under:
- Screen Recording, so viewers see your windows and not just the wallpaper.
- Accessibility, so the viewer's mouse and keyboard work.
Then quit TamimahVnc from its menu bar icon and open it again. macOS only applies these permissions after a restart of the app.
Mac settings
Open the settings from the menu bar icon. Click Save to keep your changes. While the server is running the button reads Save & Restart, which saves and restarts the server in one step.
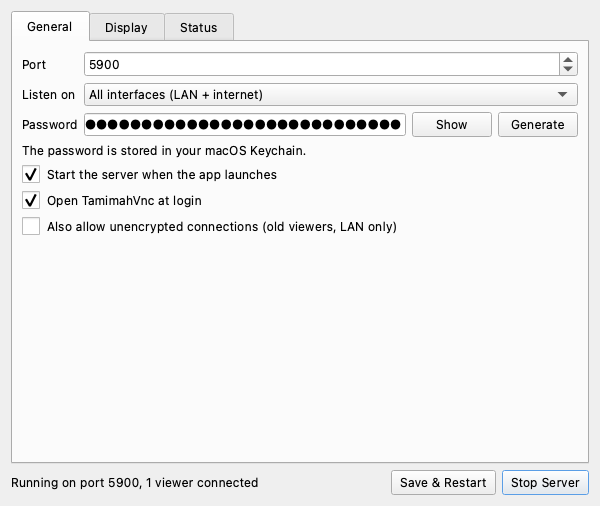
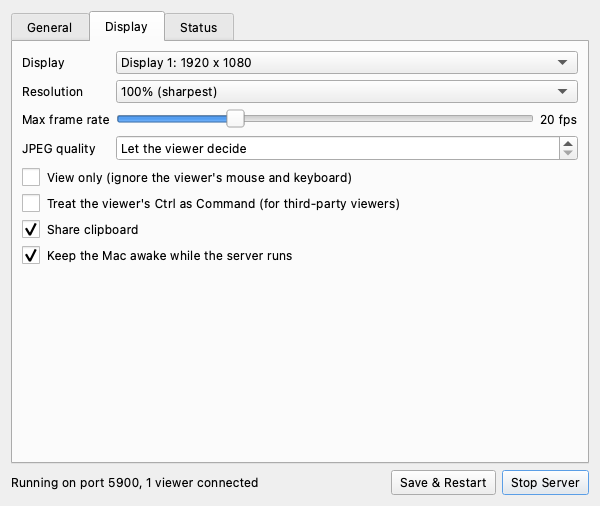
General
- Port: 5900 by default. Use 5901 if macOS Screen Sharing already uses 5900.
- Listen on: All interfaces (your network and Tailscale), Tailscale only, or This Mac only.
- Password: type one or click Generate for a long random one.
- Start the server when the app launches and Open TamimahVnc at login, so the Mac is always reachable after a restart.
- Also allow unencrypted connections: only for old viewers on a trusted network. Leave it off.
Display
- Display: which screen to share if you have more than one.
- Resolution: 100%, 75%, or 50%. Lower is faster on slow links.
- Max frame rate: 5 to 60 fps.
- JPEG quality: leave it on Let the viewer decide, or force a value.
- View only: viewers can watch but not type or click.
- Treat the viewer's Ctrl as Command: only for third-party viewers. The TamimahVnc viewer has its own setting.
- Share clipboard: text, files, and images both ways.
- Keep the Mac awake while the server runs.
Status
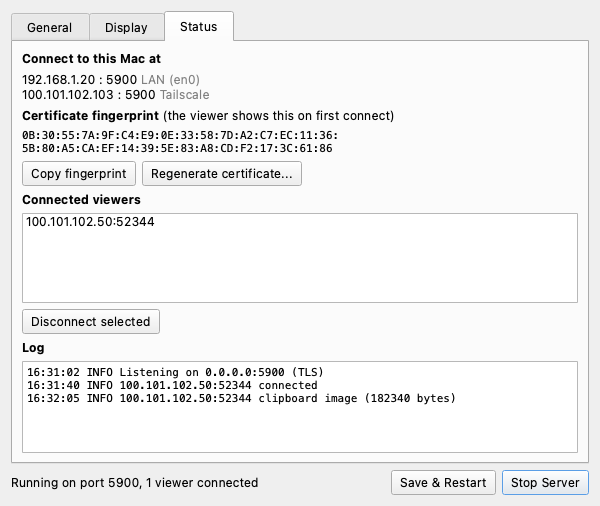
- Connect to: your Mac's addresses, such as the local network address and the
Tailscale address (
100.x.y.z). - Certificate fingerprint: compare this with what the viewer shows the first time. Copy fingerprint puts it on the clipboard; Regenerate certificate… makes a new one, and every viewer will warn once.
- Connected viewers: select one and click Disconnect selected to drop it.
- Log: connections, wrong passwords, and errors as they happen.
Install the viewer on Windows
- Right-click
TamimahVnc-Viewer-Windows.zip, choose Extract All, and runTamimahVnc-Setup.exefrom the extracted folder. - If SmartScreen shows "Windows protected your PC", click More info, then Run anyway. The installer isn't code-signed yet.
- Finish the installer. It adds a Start menu entry, an optional desktop shortcut, and an uninstaller. No admin rights are needed.
- Open TamimahVnc from the Start menu.
Connect to your Mac
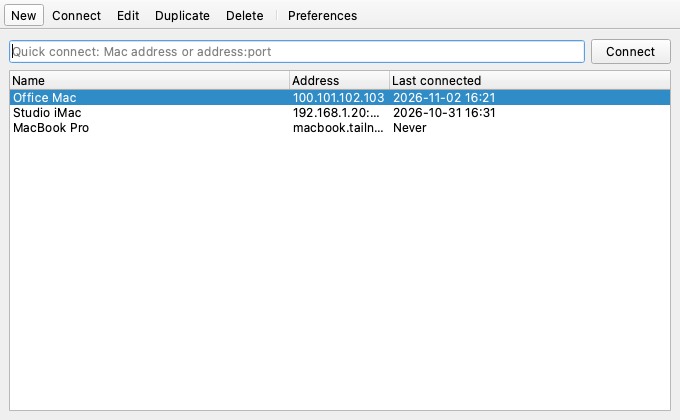
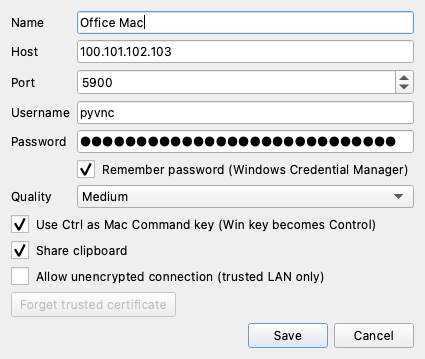
Save a connection
- Click New.
- Enter a name, the Mac's address from its Status tab, the port (5900 unless you changed it), and the password.
- Tick Remember password to keep it in Windows Credential Manager. Passwords are never written to the connections file.
- Pick a quality: Low (fast), Medium, High, Best, or Lossless.
- Click Save, then double-click the connection to open it.
Right-click a connection for Connect, Edit, Duplicate, Delete, and Forget trusted certificate.
Quick connect
Type address or address:port in the box at the top and press
Enter. The connection is added to the list for next time.
The first time: check the fingerprint
The viewer shows the Mac's certificate fingerprint. Compare it with Status → Certificate fingerprint on the Mac. If they match, click Yes. The viewer remembers it, and warns you if it ever changes.
Preferences
The Preferences button sets the default quality and keyboard mapping for new connections, whether to check fingerprints, and the theme: follow system, light, or dark.
The viewer window
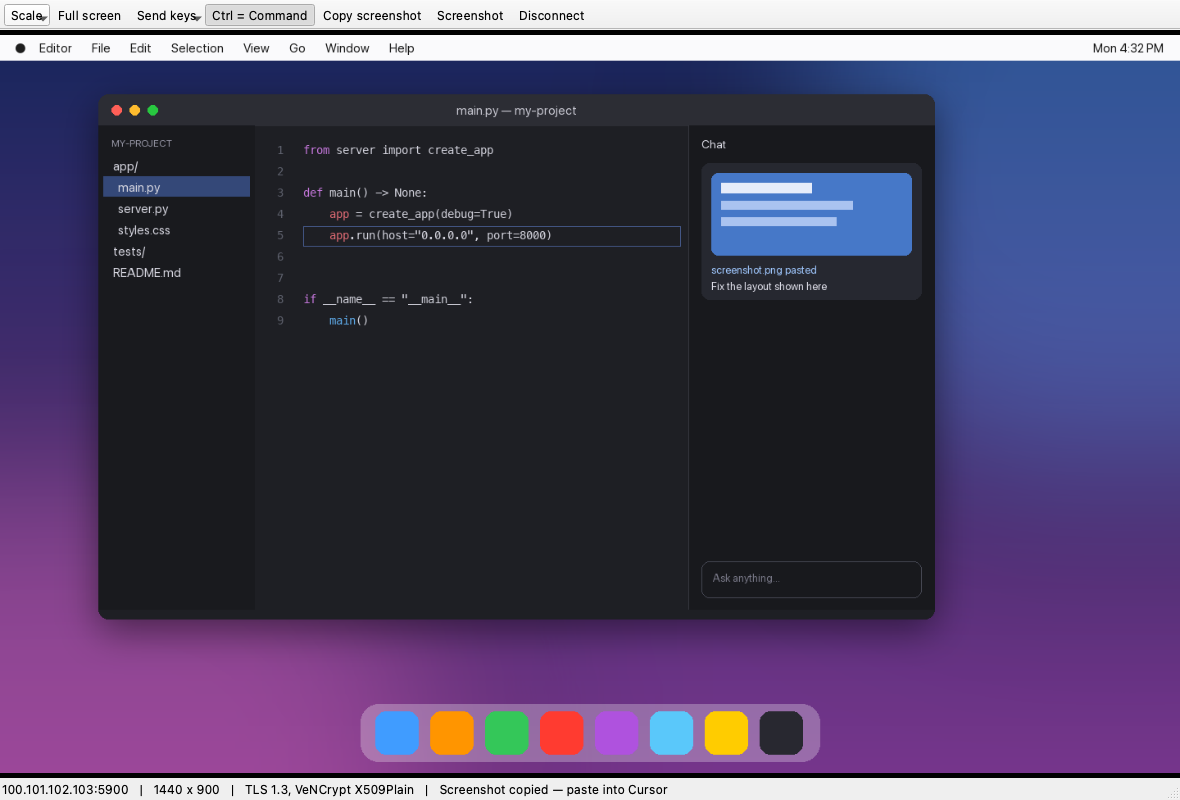
| Toolbar button | What it does |
|---|---|
| Scale | Fit to window, 100%, 75%, or 50%. |
| Full screen | Fills the monitor. Click it again to leave. |
| Send keys | Mac shortcuts Windows would otherwise catch. See Keyboard. |
| Ctrl = Command | Turns the PC keyboard mapping on or off for this window. |
| Copy screenshot | Copies the Mac screen as an image to the Windows and Mac clipboards. |
| Screenshot… | Saves the Mac screen as a PNG file on Windows. |
| Disconnect | Closes the connection. |
If the connection drops, the viewer offers to reconnect.
Keyboard
With Ctrl = Command on (the default), the PC keyboard maps to the Mac like this:
| Press on Windows | The Mac gets | Example |
|---|---|---|
| Ctrl | Command ⌘ | Ctrl+C copies, Ctrl+Tab switches apps in Cursor |
| Win | Control ⌃ | Win+C stops a command in Terminal |
| Alt | Option ⌥ | Alt+← moves back one word |
Some shortcuts are taken by Windows before the viewer sees them. Use Send keys instead:
- Cmd+Tab (switch apps)
- Cmd+Space (Spotlight)
- Cmd+W (close window) and Cmd+Q (quit app)
- Cmd+Opt+Esc (Force Quit)
- Ctrl+Up (Mission Control)
- Ctrl+Cmd+Q (lock screen)
- Cmd+Shift+3 (Mac screenshot)
Clipboard, files, and screenshots
With Share clipboard on, in both the Mac settings and the connection, whatever you copy on one side can be pasted on the other.
Text
Copy on Windows, then paste on the Mac with Ctrl+V. Copy on the Mac, then paste in any Windows app.
Files and folders
- Windows to Mac: copy files or folders in Explorer, click into the viewer, open a Finder window, and press Ctrl+V.
- Mac to Windows: copy in Finder with Ctrl+C, then paste in Explorer.
- Received files are saved under
Downloads/PyVNCfirst, then pasted where you are. - Up to 128 MB in total per copy. A progress bar shows in the viewer's status bar.
- Files move by copy and paste. Dragging files into the viewer is not supported.
Paste a Windows snip into Cursor on the Mac
- Press Win+Shift+S and draw around what you want. You can mark it up in Snipping Tool first; copy again after editing.
- Click into Cursor (or any Mac app) in the viewer.
- Press Ctrl+V. The image pastes as a picture.
Copy the Mac screen into Cursor
Click Copy screenshot in the viewer toolbar. The Mac screen goes on both clipboards, so Ctrl+V pastes it on the Mac or on Windows. A screenshot copied on the Mac with Cmd+Ctrl+Shift+4 also arrives on the Windows clipboard.
Connecting over the internet
Option A: Tailscale (recommended)
- Install Tailscale on the Mac and the PC, and sign in to the same account on both.
- On the Mac, the Status tab lists its Tailscale address (
100.x.y.z). - Connect the viewer to that address.
No router changes or open ports, and it works behind any NAT. For extra lockdown, set Listen on: Tailscale only.
Option B: router port forwarding
- Give the Mac a fixed address on your network, with a DHCP reservation or a manual IP.
- On the router, forward a TCP port to the Mac's port 5900. An unusual outside port, such as 45900, cuts down on scanner noise.
- If your home IP changes, set up dynamic DNS such as DuckDNS or No-IP.
- If the macOS firewall is on, allow incoming connections for TamimahVnc.
Windows server
To control a Windows PC instead of a Mac, extract TamimahVnc-Server-Windows.zip and run TamimahVncServer-Setup.exe
on that PC. It runs in the system tray and has the same settings window as the Mac app;
the password is stored in Windows Credential Manager. Connect with the TamimahVnc Viewer
exactly as you would to a Mac.
- Allow it through Windows Defender Firewall when asked, at least on private networks.
- Turn off Ctrl = Command in the connection, since the remote side is Windows.
- Text and files go through the clipboard. Image paste is supported on the Mac server only.
Command line (Mac)
The server can also run without the app, for example on a Mac with no one logged in to the menu bar:
.venv/bin/python -m server.main --help
.venv/bin/python -m server.main --port 5901 --scale 0.5 --fps 15
scripts/install_launch_agent.sh # start it at login| Option | Purpose |
|---|---|
--port 5901 | Use another port, for example if Screen Sharing owns 5900 |
--host 127.0.0.1 | Listen on one address only (default: all) |
--scale 0.5 | Halve the resolution on slow links |
--fps 10 | Lower CPU use and bandwidth (default 20) |
--quality 40 | Force a JPEG quality from 1 to 95 |
--display 2 | Share a second monitor |
--view-only | Watch only, no input |
--swap-ctrl-cmd | Ctrl acts as Command, for other viewers |
--no-clipboard | Turn off clipboard sharing |
--no-caffeinate | Let the Mac sleep while serving |
--password-file F | Read the password from a file |
--insecure-allow-plain | Also allow unencrypted VNC (trusted LAN testing only) |
Build from source
The source is on GitHub. You need Python 3.11 or newer.
Mac app
scripts/build_mac_app.sh          # dist/TamimahVnc.app
scripts/build_mac_app.sh --zip    # also dist/TamimahVnc-Mac.zip
scripts/build_mac_app.sh --dmg    # also dist/TamimahVnc.dmg
Windows viewer and server
scripts\build_client_windows.bat --installer   :: dist\TamimahVnc-Setup.exe and dist\TamimahVnc-Viewer-Windows.zip
scripts\build_server_windows.bat --installer   :: dist\TamimahVncServer-Setup.exe and dist\TamimahVnc-Server-Windows.zip
The --installer option needs Inno Setup 6.
Publish the downloads
Put the three zips in a downloads/ folder next to index.html on your web server:
index.html
manual.html
downloads/TamimahVnc-Mac.zip
downloads/TamimahVnc-Viewer-Windows.zip
downloads/TamimahVnc-Server-Windows.zip
Run without building
# Mac server
python3 -m venv .venv && .venv/bin/pip install -r requirements-server.txt
.venv/bin/python -m server.app

:: Windows viewer
py -3 -m venv .venv
.venv\Scripts\pip install -r requirements-client.txt
.venv\Scripts\python -m client.main
When running from source on the Mac, grant Screen Recording and Accessibility to Terminal or Python instead of TamimahVnc.
Troubleshooting
| Problem | Fix |
|---|---|
| Viewer shows only the wallpaper | Allow Screen Recording for TamimahVnc, then quit and reopen it. |
| Mouse and keyboard do nothing | Allow Accessibility for TamimahVnc, then quit and reopen it. Check View only is off. |
| Connection times out | Check the server is started, both computers are on the same network or Tailscale, the address and port match the Status tab, and Listen on isn't set to This Mac only. |
| "Port 5900 is already in use" | Turn off System Settings → General → Sharing → Screen Sharing, or change the port. |
| Wrong password, then refused | After five wrong tries, that address is blocked for 15 minutes. Wait, or restart the server. |
| Laggy or blurry | Viewer: pick Low (fast). Mac: Display tab, 50% resolution and a lower frame rate. |
| Paste doesn't arrive | Check Share clipboard is on in both the Mac settings and the connection. Click into the viewer before pasting. |
| "Certificate has CHANGED" | Expected after Regenerate on the Mac. Otherwise, don't connect. |
| Permissions reset after an update | Each build has a new signature. Remove TamimahVnc from Screen Recording and Accessibility, then add it again. |
Still stuck? Open an issue and include the lines from the Mac's Log.
Uninstall
- Mac: quit TamimahVnc from the menu bar, turn off Open TamimahVnc at login first if it's on, then drag TamimahVnc from Applications to the Trash. Remove it from Screen Recording and Accessibility in System Settings.
- Windows: Settings → Apps → Installed apps → TamimahVnc (or TamimahVnc Server) →
Uninstall. Saved connections stay in
%APPDATA%\PyVNC; delete that folder to remove them too.